Toyota and Lexus Hybrid Brake Integration Information

https://blogger.googleusercontent.com/img/b/R29vZ2xl/AVvXsEhKSGAzZR1vdzxohFR01EEsP40Ghwj4SIyAOd4hRKU_nWzIGnwwBgKoIlUoa9-GFjS4km9UUyw5K3PMdehv1jEM_EGF4Pb9TBM8ezdNnzFEqh3RdBmeyYagSFX8H2DrkcgJoPwwNF4X9OUb/s1600/11-lexus-ct200h-30.jpg

Explanation about Hybrid vehicle, with picture and example, suitable for automotive learner. Contain information about: 1967 S800 GAS TURBINE HYBRID Gas Turbine Electricity Control Unit (Chopper) Electricity Control Unit (Chopper). TOYOTA & LEXUS HYBRID DRIVE Rear-Mounted Motor Generator (MGR). Internal Combustion Engine. Hybrid Electronic Control Unit (Hybrid ECU). Conventional brakes use mechanical friction to slow the vehicle. Kinetic energy is lost as heat. Toyota Hybrid System. HYBRID SYSTEM BRAKE CONTROL.

Downloadable Car Manual

Supercharger Kit Installation Instructions – Toyota Land Cruiser 1995 – 1997

https://blogger.googleusercontent.com/img/b/R29vZ2xl/AVvXsEizLCpXrCDpZU0V32VlfFWDMmReMyywASx4SQKlDAYDKr9sQwrdyNjWU7dMVYgYDP-9MTxu-XgDA5RHsQSkQiZtpdQ_-GXZ7ILSGG_mJHURSUQif0Pre86q654ogHaF0VQLR8JcS1Of2dg/s320/Land+Cruiser+Wald.jpg

To help you later, we suggest you draw diagrams of your engine’s cable routing before disconnecting anything. You can do the same for the vacuum lines. However, some vacuum lines will be rerouted. To ensure proper hose connections, refer to the illustration in the back of this manual.

Special Tools Toyota Land Cruiser Repair Manual (available from Toyota, 1-800-622-2033). Remove the two throttle cable brackets and the Vehicle Identification Number (VIN) label attached to the cylinder head (if installed)

Downloadable Car Manual

Owners Manual – Body Electrical Troubleshooting for 2003 Toyota Tacoma

https://blogger.googleusercontent.com/img/b/R29vZ2xl/AVvXsEi1M0GJAI6Y6-xlh5Xsdk4Q0T5KaNK0q9WJiyXf0dqj-jpNWGn7j9i7JQ4YwaOvyOThtJ2fiD9bICMj2yoR_2JcIVYdT8vbgIcpKvlH3ZDemS0Dryhj77MIOfOYkymRm10K1wupkuk98dw/s320/all-terrain-pop-up-camper-7.JPG

Even if no failure is detected, it may be stored depending on the battery condition or voltage for starting an engine. It is stored when 180 sec. has passed after the power supply connector is pulled out after engine start. It may be stored when the engine key is turned 1 min. again after engine start. It may be stored when the engine key is turned again after engine start.

Downloadable Car Manual

Vauxhall Cavalier Mark III User Guide

Vauxhall Cavalier Mark III User Guide

Download User Guide Vauxhall Cavalier Mark III
free manuals

Free Diagnosis Guide Opel GT Ignition Switch Problem

https://blogger.googleusercontent.com/img/b/R29vZ2xl/AVvXsEioaVikwmbD1w5jbqtnIE3QFteTmz_2wfNgmlcwwr8K1gwHpjVp7u2rfvUT_Is_1WKi0zLWWJj2p5Cy0zulyBQuHUNjz3ZZqPEJZVUQgLqtp3VtFGvRvwDelWsoJxWZnK4CH_aExur9b5Y/s400/Opel+GT+2007+5.jpg

Content:
Typically, there’s a puff of smoke, and you’re stranded. To help prevent this, the Opel GT Ignition Switch can be tested, either in the car (using key to turn) or off the car (using a screwdriver to turn), with a simple ohm meter. Use a common volt-ohm meter, to test the switch in the “start” position.

Connect one test lead to the end of the solid red wire (A) and another to the end of the striped red/black wire (B). (See: “Fusebox View”). Release the switch for a moment. The ohms should revert back to infinity. If it doesn’t (if measurement goes back and forth), the switch may have poor internal circuit isolation, which ndicates carbon buildup or overheated parts. (If so, spray-cleaning may provide a quick-fix). If the ignition switch is verified to be in working condition, the first protective action recommended is to install a protective 4-prong 30 amp relay in the starter circuit. An inexpensive relay will take up the brunt of the current when the starter is powered, keeping it out of your valuable original GT ignition switch.

Free Diagnosis Guide Opel GT

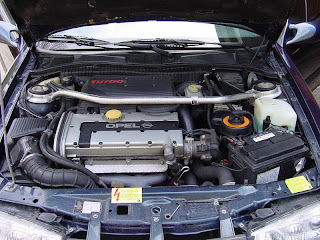
Download Tuning Guide 1.9 Liter Opel Engine

https://blogger.googleusercontent.com/img/b/R29vZ2xl/AVvXsEixHHDDwIyuJ4BixhyphenhyphenD4QMxLsTXLDKSPpDo17Q9v_KhulCie1hyR_iTG_MmUgaCfxd6-ry21Yn0x94sh1zlIhMc44StWg72BSQbWbdjqIGJ_9F5NowRMklYbnpPmbeyM2VEPypYxBILQFh2/s320/Opel+Calibra+Turbo+4x4+1994+Engine+Details.jpg

Content:
Generally, this means: Ignition: Distributor Cap & Rotor, Ignition Points, Condenser (correct type), Spark Plugs, Ignition Wires Fuel: Fuel Filter, Carburetor Air Filter, Fuel Hoses, Carburetor Gaskets, Fuel Pump Spacer Plate/Gaskets Cooling: Fan Belt, Radiator Hoses, Heater Hoses, Thermostat (decide heat range), Water Pump (if worn) Engine: Oil, Oil Filter, Valve Cover Hoses, Valve Cover Screens, Motor Mounts (if needed)

Other: Vacuum Hoses (including Brake Booster Hose), and consider re- installing carburetor and distributor Keep a record of dates and odometer mileage reading when installing, to determine component wear rates. Procedure: Acquire an engine compression gauge (screw-end type is recommended)., Make sure battery is fully charged. Remove all 4 spark plugs & disconnect coil (+) wire. Important: Remove air filter or hardware from top of carburetor, and use a tool to hold the main throttle plates of the carburetor fully open for the duration of this test. Screw the engine compression gauge, into spark-plug holes, beginning with #1 cylinder. Observe the highest number the gauge reads (the needle jerks upward about 4 times, then levels off), and write it down as the “dry” number for that engine cylinder.

Download Tuning Guide

Noise and Vibration Optimization of a Gasoline Engine Peugeot Citroen

https://blogger.googleusercontent.com/img/b/R29vZ2xl/AVvXsEj6z_LFyEBU8eutPqTAZK1PLsJgDi-BFr7a6JfN7YyKkkE1Dz9YzDb8b4EbomqvTZsr_GhJ5MoeFDFcGm1FsUP4DLW9ILOBioHOroRmZ4NiknVwI0Q0DhGXvn_FAJPWWh1yQ28jcLYvYkD7/s1600-r/9071003.006.Mini5L.jpg

The block, head and transmission were constructed of predominantly low-order hexahedral elements, whilst the ancillaries were modelled using a combination of high order tetrahedral, shell and beam elements wherever appropriate. The technical approach detailed here is representative of Ricardo’s standard methods applied to the analysis of the powertrain to optimise its noise and vibration characteristics.

Modal Analysis, Dynamic Load Calculation, The excitation loads acting on the engine were calculated using ENGDYN. ENGDYN is used to predict the time-domain response of the 3-dimensional vibration of the coupled crank train and cylinder block system with non-linear oilfilms at each of the main journal bearings.

car manuals

Complete Factory Scheduled Maintenance for Mazda Cars, Trucks and SUVs

http://4.bp.blogspot.com/_wSUG_ibJWC4/SzgrD8NCcrI/AAAAAAAABmg/85WscXjBRBk/s400/2009-Mazda-RX-8-Sports-Car-Hydrogen-RE-5.jpg

This service schedule is a simplified version of the Manufacturer’s current year’s maintenance recommendations. 5KM EVERY 5,000 MILES OR EVERY 4 MONTHS. Check function of all lights. Check operation of windshield washer spray, wiper operation, blade condition and fill washer fluid. Change engine oil.

Change engine oil filter. Lubricate all locks and hinges. Tire rotation and inspect tire wear, set inflation pressure according to inflation recommendations on tag in door jamb. Inspect disc pads and drum brake lining conditions. Check fluid level and condition of automatic transmission, brake, power steering, engine coolant, transaxle, transfer case and clutch reservoir.

Downloadable Car Manual

Owners Guide – Glove Compartment Lock Modification Volkswagen Beetle.pdf

https://blogger.googleusercontent.com/img/b/R29vZ2xl/AVvXsEgU5NBAei9DblcDxJx5a-L_Ayb4TlbnpuIG9P_56Ip8MsHRcxbMmBwUDGz7d_JAZXdRzJYlFzqHRGFT3THfz4SiFUFBHENRdRGScjDDa1BuC67qacczlneqYUFS26Nz6wdK0UCPNL_CAkE/s400/VW-Beetle_3d-auto-club.blogspot.com.jpg

This is achieved simply by cutting away the bottom collar using a sharp scalpel. When the lock and rubber grip part are inserted into the lock cylinder, the protrusion should be less than 1 cm, as can be seen here in the diagram. Modifying the glove compartment lock was a defiant move on my part to show the Vehicle Inspectorate that this Beetle owner will not be intimidated.

Downloadable Car Manual

Complete Guide Transmission Conversion Manual for 1996 – 1999 Nissan Pathfinder

http://3.bp.blogspot.com/_lsyt_wQ2awY/SLEYaqfReGI/AAAAAAAAVaI/uKjIpueQgB4/s400/Nissan-Pathfinder_2005_800x600_wallpaper_09.jpg

Electronic Control Module Replacement, ASCD Modification, Park Neutral Switch Modification, Clutch activation system, Clutch lines installation, Manual Transmission Wiring, Manual Transmission Installation. Remove the ashtray. Remove the screw under the ashtray and pull out the bezel that covers the automatic transmission shifter. Remove all screws holding the center console and lift it up.

Under the rear of the console unplug the rear power outlet connection. Make sure the negative battery cable is disconnected. Remove the existing ECM from under the dash above the accelerator pedal. It’s easiest to remove the plastic panel under the steering column. Using a 10mm socket unbolt the ECM’s electrical connector and unplug.

Downloadable Car Manual

Download Engine Operation and Maintenance Manual for Volvo TruckDownload Engine Operation and Maintenance Manual for Volvo Truck

http://1.bp.blogspot.com/_FoXyvaPSnVk/SWYYqbgPZLI/AAAAAAABeAI/y3260Bn6mvQ/s400/Volvo-FH16-1.jpg

D12 Typical Engine Compartment Overview Engine Features VECTRO II Parameter Values, D7 VECTRO II Parameter Values, D12 Engine Variants, D7 Engine Variants, D12 Engine Data. Heavy-Duty Service Schedule for VHD-Series General and Check-Chart Maintenance Categories. Maintenance Engine, Maintenance Flushing Cooling System, D7 Flushing Cooling System, D12 Turbo and Charge Air Cooler. Replacing Fuel Filters, Fuel System Service Transmission and Rear Axle Maintenance.

Downloadable Car Manual